Thursday, October 13, 2016

Vibrant Fall Leaves


“Autumn burned brightly, a running flame through the mountains, a torch flung to the trees.” ~Faith Baldwin, American Family 

Soaking in the beautiful fall colors while taking a drive around the Matapedia, QC area

Thursday, October 6, 2016

Awesome Shell Fragment


While spending a fun filled day at the beach with family, I found this beautiful seashell fragment!
What I love about it is that it's only a sliver of the clam shell which inspires me to make a necklace; I haven't started the work yet, but I think I will keep the design simple in keeping with the clean lines of the shell itself.  

Not sure if I will make it out of copper and silver combo or perhaps I'll go with brass and gold filled ...  Still mulling that over...  I will add the progress to my blog.

**We welcome customs orders.  If you have a vision and would like your stone, wood, shell or other turned into a piece of jewelry for you or for a gift, please contact us.

Thursday, September 15, 2016

The Clay Caterpillar


My little granddaughter's clay caterpillar creation!
She is quite creative for her age and comes up with the cutest 
little clay creatures!  

A child really doesn't need much to have fun:   a bit of colorful
play dough, a flat surface and their imagination!

Although she is quite well equipped with play dough tools
I remember my children having just as much fun by raiding my 
kitchen drawers!

Friday, August 12, 2016

Turquoise and Pearl Bracelet


Multi Wrap Bracelet in Sterling Silver with Turquoise and
natural pearls.  The bracelet has lots of sterling silver in its design.  The Oval is handcrafted by wrapping thin wire around a thicker oval wire and then soldered closed.  I wanted to add hearts and decided to compliment the design by adding a heart clasp hook as well.  

I love the pearls in contrast with the Turquoise!  These pearls are naturally colored in these gorgeous
shades of peach, lavender and off white.  I am in love with these pearls!!  

Each link of the bracelet is hand twisted.  I am a big believer is handcrafting all of my components whenever I can.  

Thursday, August 11, 2016

How to Patina Copper and Sterling Silver


How do you turn a shiny copper ring to a beautiful copper ring covered with a dark patina?

There are different methods, but I use a product called Liver of Sulfur-

Please Beware:  This product has dangerous fumes and should be handled only in a well ventilated area.  Do not handle the product with your hands.  Wear gloves or use tweezers to hold your piece.  Another thing you should know is that it smells of rotten eggs!!  That's right... rotten eggs!!  :)


The pictures below will show you  my method:  

1st thing to do is to clean your piece of jewelry or metal with pickle solution (please don't reach for the pickle jar from your refrigerator).  When I mention pickle solution I mean an acid base mixture used to remove dirt, oil or fire scale.  You can make a basic pickle solution with citric acid which works very well for copper and silver (I'll post an article about it in the future).

*As mentioned previously, make sure to not handle your jewelry with your hands, after you've done pickling it in your acid solution.  The oil from your fingers will interfere with the patina.

Secondly, I use a small Crock Pot (they're quite inexpensive, but I got mine as a bonus when I purchased my large Crock pot for my kitchen).  

I add a bit of water, no more than about 1/2 cup to my crock pot put it on and wait for the water to get hot;

Once water is hot, add a thumbnail size of the Liver of Sulfur to the hot water and stir until it dissolves (use a junk piece of metal to stir);

You can also add 1 tsp of ammonia (I didn't do this thus far, but it's advised to this in order the deepen the patina);

*Dip your piece of metal quickly, rinse it, check to see if the color is to your liking and if not, dip it again and repeat the rinsing process.

You can use a brass brush to sort of polish it up and repeat the dipping and re-polish.

I hope my method was helpful for you beginners out there!


Thursday, August 4, 2016

Personalized Wire Wrapped Heart Wreath


I was asked to make a wire heart wreath, and yes wire.  Lots and lots of wire and a combination of carefully selected glass and acrylic beads.  

This was for an anniversary gift.  

These wreaths can me made in any shape and they make wonderful welcome wreaths as well.  I sold many smaller versions of these as sun catchers or even as door hangers.  

**Just wanted to let all you jewelry makers out there that Fire Mountain Gems is offering 80% off almost 5,000 gems, jewelry and beading supplies!!  Great time to stock up!!!  Click here to go to their site.


Tuesday, August 2, 2016

Rustic Copper Spotted Bracelets


Finished an order of 4, Rustic Copper Spotted Bracelets with Sterling Silver and
multi leather.  

Although these bracelets have a sturdy clasp on them, I added two slip knots on the leather part.  I find it make sit easier for the customer to size the bracelet perfectly to their wrist size. 

**Just wanted to let all you jewelry makers out there that Fire Mountain Gems is offering 80% off almost 5,000 gems, jewelry and beading supplies!!  Great time to stock up!!!  Click here to go to their site.


Saturday, June 25, 2016

Inspired By A Swallowtail Butterfly


I'm doing a bit of work around the yard these days and I'm noticing many Swallowtail Butterflies around my flowers.  These Butterflies are so pretty!  I especially love the blue with a dab of orange along the back of the wings!

I would love to design a jewelry set in that blue!

I found these beads and shells at Fire Mountain Gems and I think the blue is quite similar (a little side note- there are 527 pages of blue beads and jewelry components.  I sipped on a coffee and relaxed while browsing):

*Beautiful Paua Shell is one of my favorites!!  The blue Swarovski Crystals are very pretty as well!


Saturday, June 18, 2016

Free Hand Engraving on Rustic Copper Rings


I am often asked to engrave my copper 
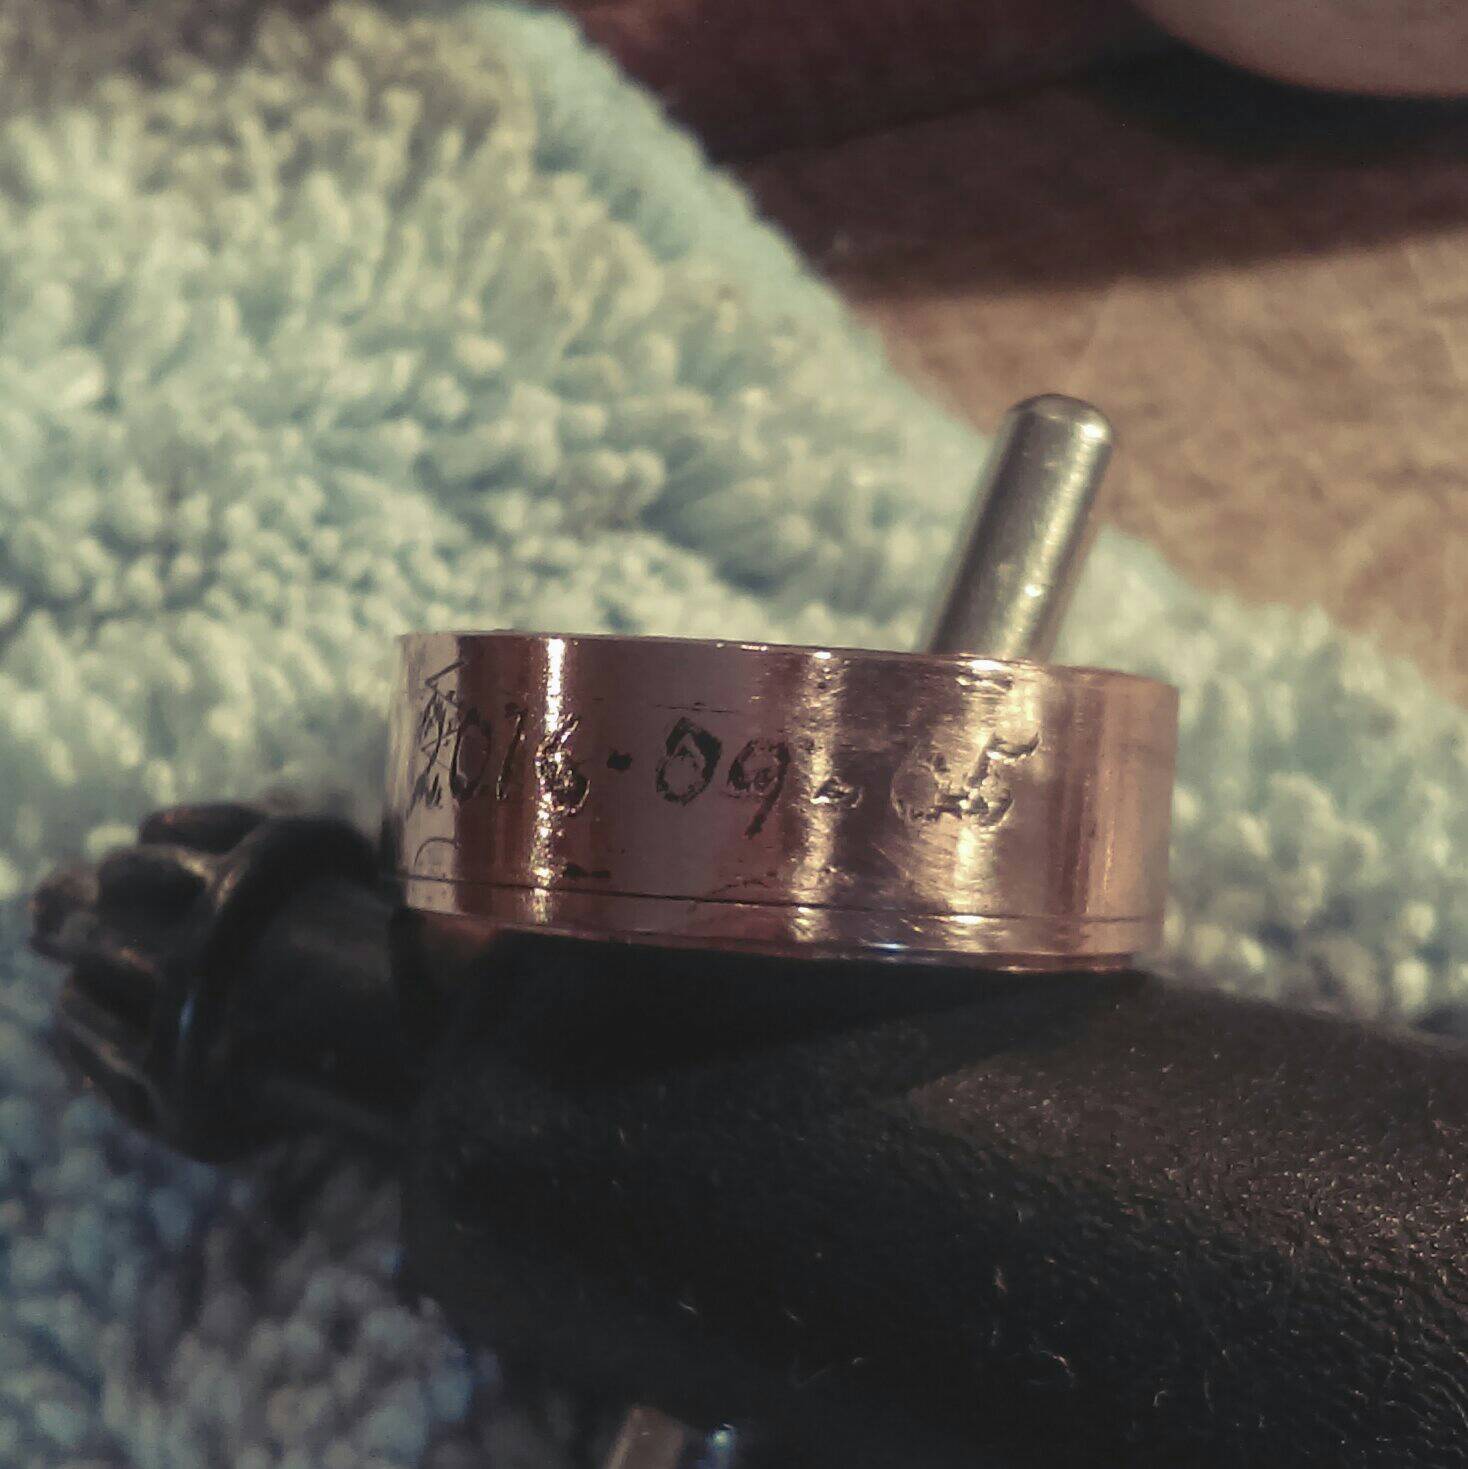
rings.  I do not have the equipment to do a professional engraving job, but I do have the tools to engrave free-hand.  I quickly wrote a date on the outside of this ring to show a potential customer what a free hand engraving would look like.  It was sooo difficult to take a decent picture.  Too much glare from the metal.   I had to darken the photograph a bit.  I usually don't engrave on the outside, it's mostly on the inside of the rings that I am asked to do this.

I think the free-hand engraving adds and compliments the rustic feel of my rings!


Thursday, June 16, 2016

Hummingbird at Feeder


We have the privilege of admiring these beautiful little Hummingbirds from our kitchen window.
We enjoy watching them as they guard their feeder!  LOL!  I just wanted to share how cute our little visitors are!  Enjoy!

Visit my store for Handmade Jewelry and More...

Thursday, June 9, 2016

Latest Project: Abstract Tree Pendant With Filigree Leaves


Latest project that I'm working on:

Copper and Sterling Silver Pendant with tree and leaves.  I'm making a few cutout leaves
and I'll be adding some filigree to fill in the leaves.

I sweat soldered the leaf and the tree to the copper plate.

If you're looking for a custom made piece, contact me.

See more Jewelry Here.

Tuesday, June 7, 2016

Keepsake Necklace with White Oak Cab


The last of the three White Oak Leaf, Keepsake Necklaces:
Sterling Silver Leaf which is sweat soldered to a copper base.  I made a cab out of a piece of salvaged white oak from an old tree and added it to the pendant.  
Because the pendant is so rustic, I decided to compliment the pendant with a mutli-leather, brown necklace with rustic copper hook and eye.  
*Order A Keepsake Necklace for yourself or someone you love; They make the best gift!

Monday, June 6, 2016

Finished White Oak Leaf Pendant with Acorn


Sometimes, you come up with an idea in your head, transfer it to paper and the actual piece doesn’t always come out exactly as you first imagined it.  But this piece is pretty much what I designed it to be.  
I purposely added the dark, vein-like lines in the leaf by dragging a piece of metal through the molten enamel. Because the copper was slightly exposed, it created oxidization which led to the lines turning black.  It really gives the piece a more rustic look!  I just love playing with oxidization!!  
The Oak Acorn I made from a piece of white oak piece which I carved into a ball which I drilled like a bead.  I made the cap part out of sheet copper, formed, textured and soldered.  I covered the wood with epoxy.
The Acorn lays flat so that it can sit properly when worn.

Wednesday, June 1, 2016

Finished, White Oak Leaf Pendant with Cab


Here is the final result of the White Oak Leaf Pendant I was working on.  I made a cab from a piece of White Oak which I formed and covered in epoxy to protect it from water.  
I made the leaf out of copper sheet and sweat soldered it to a plate of sterling silver.  
The pendant measures 1-1/2″ x 1/2″.

Friday, May 27, 2016

Acorn Pendant With Oak Tree Remnant


I designed this little acorn to dangle along with an Oak Leaf Pendant I made.  
I made it so that it sits flat.  The whole thing is made of copper sheet which
was cut, formed, textured and soldered together.  
The best way to form a ball shape is with a dapping punch, a block and a hammer.

The wooden bead I made from a piece of an Old Oak Tree.  
I drilled a whole through the wood and through the copper cap (this step is not in the photographs).

Progress Oak Leaf Pendant


Custom Pendant With Piece of an Old Oak Tree-
I made the bezel with a strip of pure silver bezel wire, shaped it and sized it to my wood cab, soldered the ends together and then soldered it to the pendant plate.  I was so happy that I didn’t run into any problems!  I prepared the wood cab by forming, sanding and sealing it with epoxy (because the cab is made of old dead tree pieces, I thought it would be best to seal it in order to protect it from water.  

Thursday, May 19, 2016

Oak Leaf Pendant Almost Finished


I am almost done this pendant.  I'm working on the wood cab you see
on the pendant.  it will be a bit smaller than you see.  

Here is what I'll be doing next:
- Covering the cab with epoxy (the reason for this is because this piece of 
oak comes from old wood pieces salvaged from a dead oak tree and they're
quite fragile.  By completely covering them with epoxy, I figured they 
would be protected from wear and tear).  

2.  Adding a bezel (a strip of silver soldered to the plate to hold the wood cab 
into place).

3.  Finish the bail (to hang to the chain).

4.  Polish it up and add a bit of darkening solution to make the leaf pop out.

5.  Package it and send it on its way to my customer!