Monday, December 25, 2017

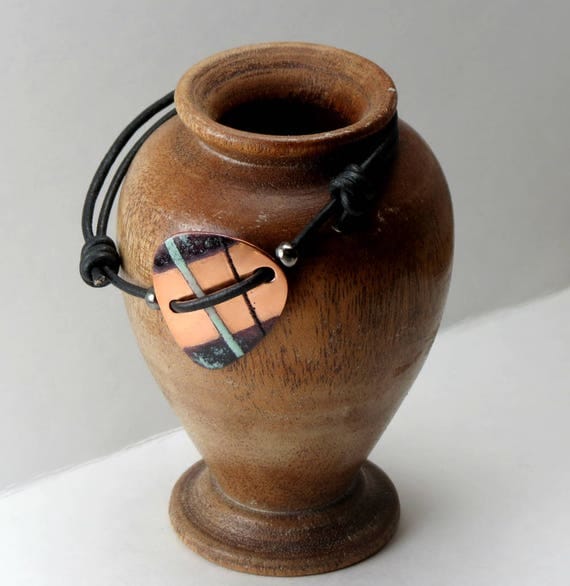
Finished Copper Pick Bracelet


So here is a picture of my finished, pick bracelet on 1.0 mm black leather cord.  Very unique piece indeed!  I decided to go with the slipknot instead of a clasp because I find it just looked really nice this way.  Plus, it can fit a variety of sizes. 


In my previous blog post, I wrote about I hoped to be able to achieve a mirror finish.  I looked it up online and followed instructions and it came out pretty good.  I'm happy with the finish product!

The pick bracelet is an awesome gift idea for the guitar player.  You can purchase this bracelet from my website Bayside Wire Designs

Saturday, October 21, 2017

Geometric, Copper Guitar Pick Bracelet (in progress)


I'm working on a unisex bracelet with a copper pick as the focal.  I cut out the pick from a larger piece of copper (you can find various sizes copper sheet on Amazon).
In order to not obstruct the look of the pick, I decided that its direction should be slightly on a diagonal  (notice the holes drilled for attaching the bracelet).
After many sketches, I finally decided on a pattern where I would fire multiple overlapping layers of enamel with my torch.  One thing I love about torch firing on copper is how the copper turns different colors depending on the heat (You can actually "Flame Paint" the sheet with a torch- the results are amazing)!
I have yet to polish the piece; I want the exposed copper parts to have a mirror-like finish... at least that's what I want.  If I can attain it is another thing.  We shall see!


Getting Picky


The beginning steps to a guitar pick bracelet-  

Saturday, June 17, 2017

Wide Copper Spinner Ring


Here is one of my latest rings:  a wide (12-13mm / 4/8"), copper spinner ring with three different silver bands.  I'm loving this ring!  The copper is finished with a rich, dark patina.  You can purchase this ring here. 

I recycle copper pipes to make these rings.  I love every step of this process!  What can I say, I have a thing for rustic, hipster jewelry!  See more copper jewelry here.

Thursday, May 25, 2017

Tutorials for a Turquoise Bracelet, Necklace and Earrings


Did you know that Turquoise is a major trend in jewelry for this summer!  The greatest thing about making jewelry is that you can make your very own unique accessories to fit your personal style.  Or you may want to make something as a gift.  Handmade gifts are always treasured because they're a labor of love!

So here is a great free tutorial-  Let yourself be inspired:
Bracelet with Chalk Turquoise Gemstone Beads, Glass Beads and Metal Beads
Also, I want to let you know that often I promote my own jewelry and other crafts I might design, but my blog also contains affiliate links.  That means, if you happen to click through them and make a purchase, I would be compensated for advertising them.  Thanks for looking!
*******
Here is another free tutorial you might enjoy-  

Single-Strand Necklace and Earring Set with Cultured Freshwater Pearls, Turquoise Gemstone Beads and Swarovski Crystal.  Click here for the tutorial.


Happy Jewelry Making!  
Thanks for stopping by!  

Wednesday, May 10, 2017

Sixty Six Bracelets Later


I finished the bracelets I talked about in the previous post! I'll admit it was not easy! My finger tips have yet to recover from handling the metal and sliding the waxed cord knots. I've been applying vitamin E oil repeatedly, which is quite soothing. I hope I don't develop huge calluses on my fingers... well, at least they'll match my unsightly nails!! The sanding did a terrible number on my nails.

So, after all that whining, I'll share with you some pictures of what started as basic pieces of metal and cotton string...


...is now this:


I really like the blue, waxed cotton (reminds me of jeans); I just love it!


All of the little bracelets have been neatly tucked away in cute, shiny, gift bags and ready to be shipped.

Although the project (66 handmade bracelets) was a bit daunting at times, especially when I would need to restart a piece because of an engraving error (this happened quite a few times because of a little mishap with my engraving machine. Although it set me back a bit, I powered through and was successful in completing the project without being overwhelmed. And I have to say, at the end of a project like this, I always feel happy to have given my all.


Saturday, April 22, 2017

66 Personalized Bracelets to Make

I've got a large order of 66 personalized bracelets. How can I make all those bracelets without being overwhelmed and losing my mind?? One bracelet at a time. Being constant is the trick for me.

The first step was to take my template and mark the sizes on my metal and then "cut each one by hand with metal sheers." I know!! Who does that?

The strips in the pile you see in the 1st photograph, have all been cut and roughly sanded into shape (I use an electric power tool for that job). Because I'm using a power tool, the strips get hot! hot! hot! I cannot hold them without a thick cloth to protect my fingers.

Also, you'll notice I drilled the holes in the metal strips. I love drilling the holes! Because I dip the tip of my bit into beeswax, there is a lovely honey scent in my studio! Oh! And check out the wood piece in the top photograph (the bottom left corner). See the holes? Those are the holes I leave behind after my drill bit goes through the metal and into the wood. Better to do that than ruin my table surface!

My next step is brushing my metal for a nice finish!

I'll keep you posted of my progress!

Thanks for dropping by. If you enjoyed my post, please share.
Saturday, April 8, 2017

What Can You Make with Washers?

I purchased a bunch of small washers and was wondering how to use them in my jewelry designs. So, after playing with them a bit, I decided to drill them and dome them with an abstract brushed surface.

Wow!!  I am so pleased with how they turned out!  You can't even tell these were "washers."

They actually inspired me to make these "Summer Earrings" with "Purple Coral.